Hosting Static Website in Amazon S3 Bucket
In this exercise, you will host a Static Website in Amazon S3 Bucket. First, you will create an Amazon S3 bucket and then set S3 bucket for hosting a static website, then upload web pages, and grant permissions, finally test the website.
Objectives:
• Prepare a S3 bucket for hosting a static website
• Upload a custom website and test its public access
A. Create a S3 bucket :
1. Login to your AWS free tier account and on the AWS Management Console, use the AWS search bar to search for S3 and then choose the S3 service from the list of results.
2. For Object Ownership, choose ACLs enabled.

3. De-Select Block all public access option to enable public access and then leave all other options under block all public access deselected. Please keep in mind- in a production environment, it is recommended to use the least permissive settings possible.
4. Then, check I acknowledge that the current …
5. Next, choose Create bucket

Note: Amazon S3 bucket names must be globally unique. If you receive an error stating Bucket with the same name already exists, add some other characters with the name and try again until the name is accepted.
B. Set the S3 bucket for web hosting:
1. Select the bucket you created to open it. The overview tab opens.
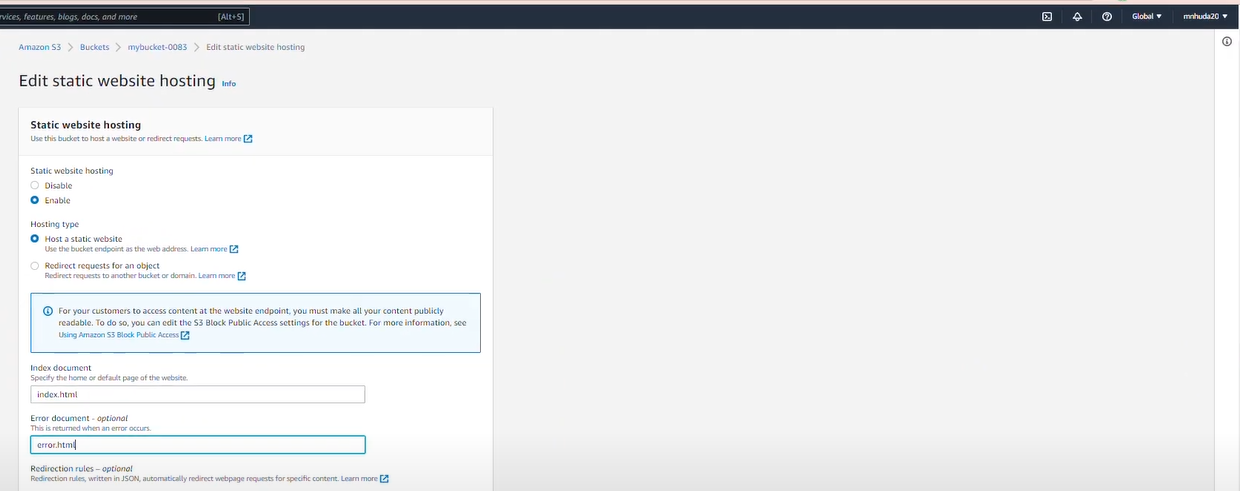
2. Choose the Properties tab and scroll down to Static website hosting area and select Edit button to edit the settings.
3. Select Enable option and then select Host a static website option
4. For Index document, enter: index.html
5. For Error document, enter: error.html
6. Then, save changes.
C. Upload a static website and give permissions:
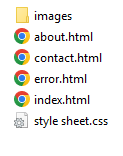
Before you upload the files and folders to the bucket, you need to create your html/css files using simple text editor such as notepad or notepad++. Static website can contain .html, .css and .js files. From each page there should be options/links/menu to go to any other pages.
1. following webpages.
Home page (index.html): Write at least on paragraph of text describing yourself and/or your interest. Include your full name, an image or video (of nature or pet or yourself) in the page.
About page (about.html): Your brief biography including your name
Contact page (contact.html): A contact address and phone number and your name.
2. Then, go to the objects tab of the bucket and click “Upload” buttons. Make sure to select index.html file, other applicable html/css files and subfolders.
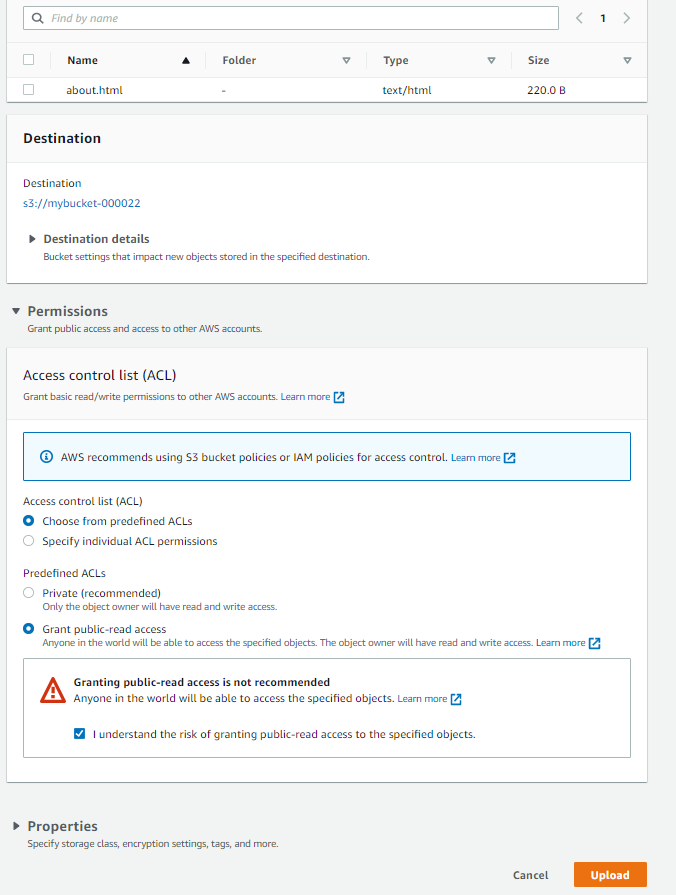
3. Once the files have been opened, (or dragged and dropped) and before you click on the upload button again, select all of the files from the AWS upload screen and expand to permissions option and grant public-read access.
4. Also check on “I understand….” and then click on upload. Make sure that the files have been uploaded.
D. Test the Website
1. Go to the S3 bucket and go to its properties tab. Then scroll down to Static website hosting area on the page and copy the “Bucket website endpoint”
2. Then, open a browser tab on your computer and paste the endpoint. The website should load on the browser.
3. Then, navigate to About page of your site.
4. Finally, navigate to Contact page of your site
Cleanup:
1. First, empty the S3 bucket i.e., delete all the objects/files from the S3 bucket.
2. Then, delete the S3 bucket itself.
