Backup & Restore Amazon EC2 Instances Using AWS Backup
This is a tutorial on Backup & Restore Amazon EC2 Instances Using AWS Backup. It shows how to use AWS Backup to create on-demand backup, backup plan, add resources to a backup plan and restore EC2 instances.
Objectives:
- Create an on-demand backup job of an Amazon EC2 instance
- Create a backup plan to automate backup Amazon EC2 resources
- Add resources to an existing backup plan using tags
- Restore an EC2 instance from a backup.
Preparation:
Have the EC2 Instance ready; If needed, create an EC2 Instance and give it a name (e.g., MyUbuntu-XXXX).
The instance should be available in the EC2 instance list under EC2 Dashboard.
Backup Option 1: Manual Backup
Configure an on-demand AWS Backup job of an EC2 instance
1. From AWS Management Console, search for AWS Backup and open AWS Backup console.
2. On the left side of the AWS Backup console, under My account, choose Settings. On the Service opt-in page, select the Configure resources
3. Enable EC2, disable all other and Confirm
Select the Dashboard on the left navigation pane and select the Create an on-demand backup

Figure 5: Create On demand backup4. On the Create on-demand backup page, choose EC2for Amazon EC2 instance.
5. Choose your Instance ID of the EC2 resource that you created before (MyUbuntu-XXXX).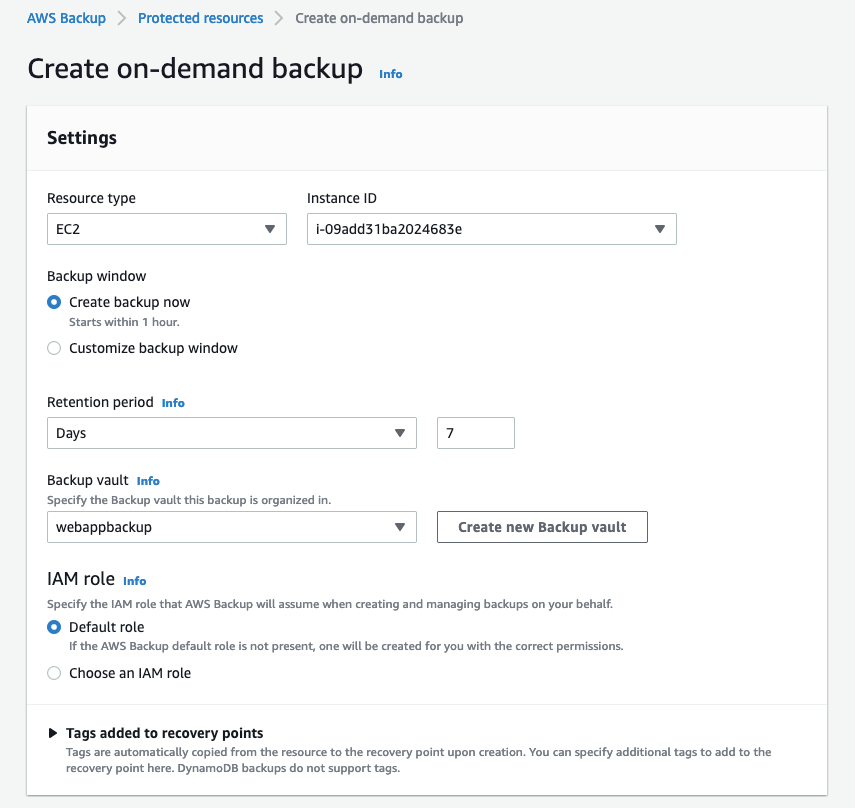 Figure 6: Create On-demand backup-
6. In the Backup window, select Create backup now.
7. In the Retention period section, set Retention period of 7 days.
8. In the Backup vault section, create a new backup vault.
9. Enter a name for your backup vault as “webapp-XXXX”
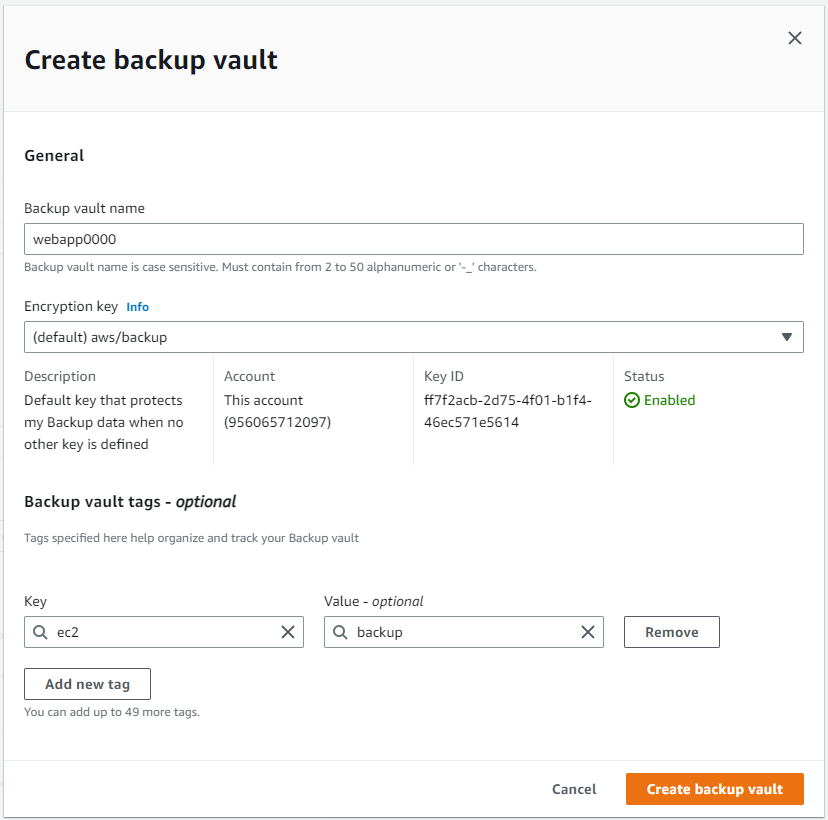
Figure 7: Create Backup vault
7. Select the default AWS Backup master key.
8. Add (EC2/backup) tag key value pair.
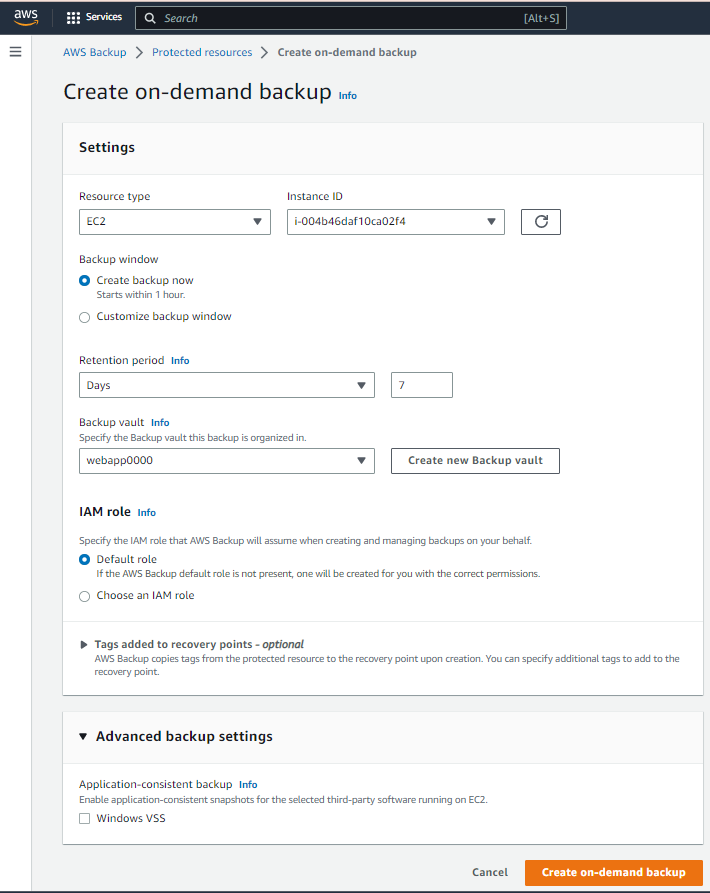 Figure 8: Create On-demand backup-3
9. Click on Create backup vault
10. Back on the Create on-demand backup page, after you have created a new vault, choose the Default role for the IAM role.
11. Select the Create on-demand backup. As you selected “Create backup now” option, this will backup the EC2 instance and take you to the Jobs page, where you will see a list of jobs.
12. In the Jobs panel under My account, ensure the Backup jobs tab is selected. After some time, the Status of the backup job will go from Created to Completed, meaning the EC2 instance was backed up.
 Figure 9: Backup Jobs panel
Backup Option 2: Automatic Backup
Configure an automatic AWS Backup job of an EC2 instance
Instead of on demand backup, you can make a plan for a backup as shown below.
1. In the AWS Backup console, under My account, select Backup plans on the left rail, and then select the Create Backup plan button.
Backup plan name – mybackup-plan-XXXX
Backup rule name – backup-rule-XXXX
Backup vault – webapp-XXXX
Backup Frequency – Daily
Backup window – Default backup window.
Transition to cold storage – Never
Retention period – 7 Days
Copy to destination: leave it as the default. (Note: Cross-region copy incurs additional data transfer costs.)
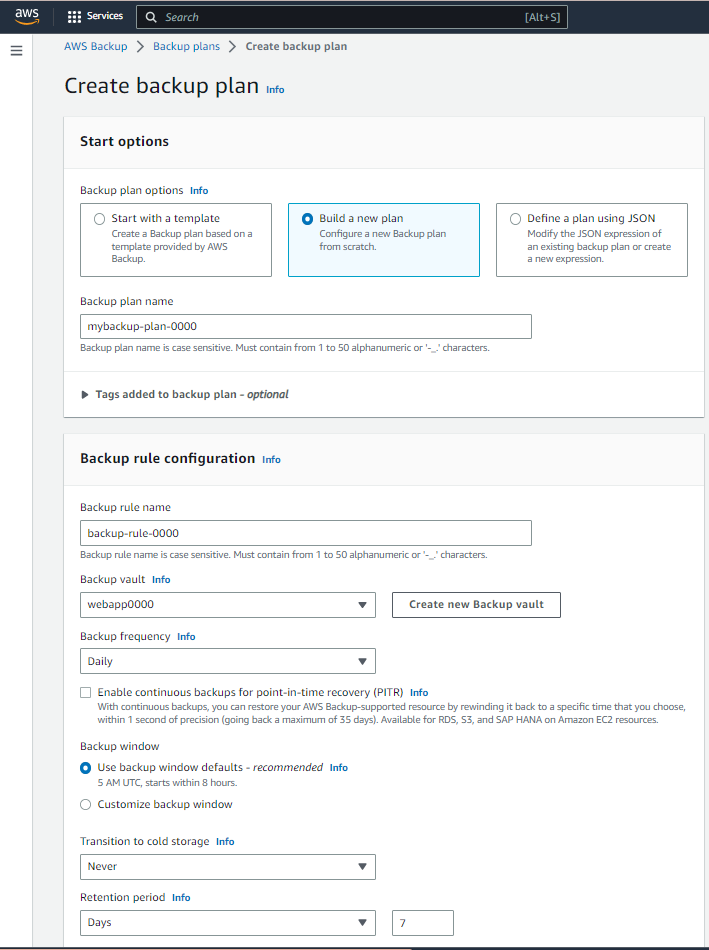 Figure 10: Create backup plan
2. After all selection, select the Create Plan
3. When you assign a resource to a backup plan, that resource will be backed up automatically according to the backup plan. (default 5 AM UTC)
Assign resources to the backup plan
1. Select the created backup plan (mybackup-plan-XXXX) and select the Assign resources button.
2. For assign resources, use the following settings.
Resource assignment name: EC2-resource-XXXX.
IAM Role: Default role.
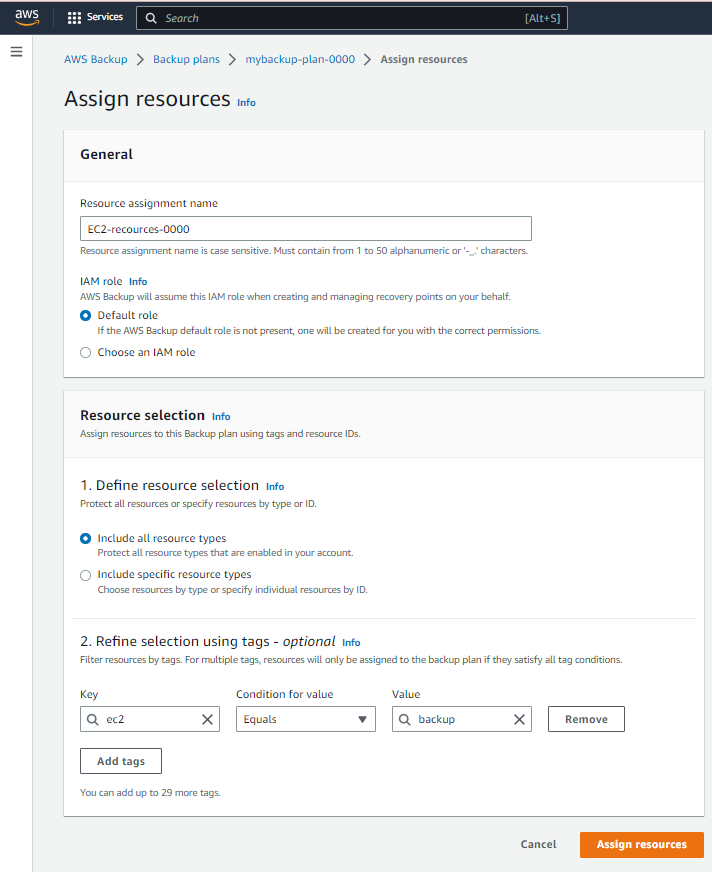 Figure 11: Assign Resources
3. In the resource selection area, select “Refine selection using tags” and use the key-value pair (EC2/backup). Finally select Assign resources button.
4. Confirm at the Continue resource assignment dialog box. If you wait until the backup window time that was set in the backup plan, a new backup job will be automatically created. If you select Jobs menu under My account in the left navigation pane you should see the new backup job. However, for this lab, you do not need to wait for the automatic backup to finish.
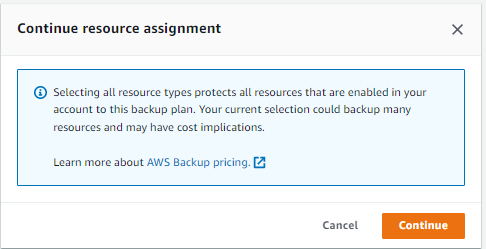 Figure 12: Assign Resources 2
5. Select your created backup plan. It should show the details of your backup plan including the backup rules and resource assignments.
 Figure 13: Detail of backup plan
Restoring your Amazon EC2 instance using AWS Backup
1. First, terminate the EC2 Instance MyUbuntu-XXXX from the instance list in EC2 dashboard.
2. Navigate to your backup vault and select the latest recovery point ID. It should show the detail of the recovery point.

Figure 14: Detail of backup vault
3. To restore the EC2 instance, click on the Restore button and complete the restore process. A new restore job should be created and it should be in progress for few minutes.
[caption id="attachment_747" align="alignnone" width="1186"] Figure 15: Restore Jobs panel
4. Wait for the restore job to complete. After the restore is complete, navigate to EC2 dashboard and make sure you see the restored EC2 instance. The restored EC2 instance will not have a name.
Cleanup:
1. Terminate all EC2 instances from EC2 Dashboard.
2. Go to AWS Backup and open your backup vault (webapp-XXXX). Delete the recovery point and the vault itself.
3. Open your backup plan (mybackup-plan-XXXX). Delete the resource assignment and the backup plan itself.


